SHOUT OUT!

I’d like to thank Louise Sims for helping me to create my website and further my learning in advancing my knowledge in “Tech 4 Stampers“. Louise Sims is a gem of a teacher and I consider her a friend! She has helped many Stampin’ UP! demonstrators develop their own websites to enhance their paper crafing businesses. Thank you Louise Sims and everyone at Tech4Stampers and the Stampin’ Website School who help us to become comfortable with our tech!
This month’s Tech4Stampers Blog Hop is Themed “Summer Fun”!
I am so happy that you could join us today for this blog hop for ideas and creative inspiration. We are a group of Stampin’ Up!® Demonstrators from around the world that are growing together to build a successful Stampin’ Up!® business and reaching some goals we have set for ourselves. And, we really appreciate your support.
You may be starting here or have come from another blog – either way you can find the link list toward the bottom of this post so that you can see every blog post today.
If you like what you see and you are inspired to duplicate this card, please go to my store and use theJuly host code FHBR9G69 when placing your order or send me a note at info@thesunrisestamper.com to connect with me. Don’t forget to scroll all the way through to see the other Demonstrators who are hopping in July!
Joyful July!!
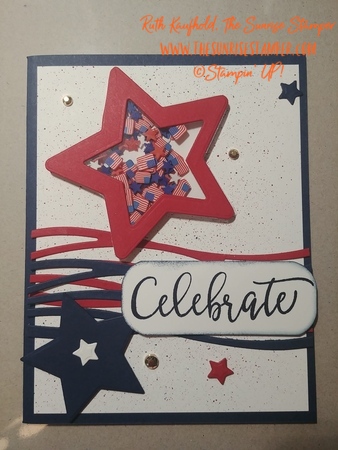
Joyful July is Celebrating Independence Day in the United States. My family has many roots in the military and we are very patriotic. We love the path to freedom our founders took as Godly men who followed the Christian principles to set up a Republic directed by God.

Card Supplies and Instructions
This card is a fun card to move forward from a casual stamping category.
Product List- Cut the Papers:
a. Cut a Night of Navy Base Card 5-1/2″ x 8-1/2″; scored at 4-1/4;
b. Cut a Basic White Layer 5-1/4″ x 4″;
c. Cut a Basic White Scrap 2-3/4″x1″ for the message;
d. Cut a Basic White Scrap Star as the base of the Red Embellishment star; - Die Cut stars:
a. Real Red Star– where one star is set inside another to get the opening for the embellishment star in Real Red
b. Navy Star — Smaller in Night of Navy
c. White Star — Same size as Red Star but solid.
e. Smaller Real Red and Night of Navy small star to decorate - Die Cut the Red and Navy Swirly Scribbles.
- Take the Basic White layer and “Splatter” ink all over the paper with the Real Red and Night of Navy Stampin’ Write Markers. Using the “cap” of the marker and “broad” end of the marker … “flick” ink all over the layer in each color.
- a. Stamp the Basic White Message “Celebrate” from the Create with Friends Stamp set
b. Round the Corners with the Detailed Trio Punch - Create Red Star with Embellishments:
a. Cut a Star in the Window Sheets that is solid. You might have to run the window sheets through the die cut a couple of times.
b. Attach the Window Sheet Star to the Red Star that is not solid using the Tombow glue.
c. Attach the Foam Adhesive Strips to all sides of the star … except one….enabling a place to load the embellishment.
d. Attach the White Star to the back of the Red Star with the Foam Adhesive Strips.
e. Pour the embellishments into the Red Star.
f. Connect the Red and White Star together with a Foam Adhesive Strip to seal in the embellishments. - Assemble the Card as shown. Add gold gems.
It’s Sale-A-Bration Time at Stampin’ UP!
For every $50 (USD) you purchase … you get a Free ITEM from the Sale-A-Bration Catalog. Click on the Sale-A-Bration catalog on the right of this blog to see all the AWESOME FREE Items!


A lovely fun patriotic card
What a Super fun, patriotic and summer celebration card!
Fabulous card Ruth. Just perfect for July.
I just love this card! That was very creative. Thank you for sharing.
Nice post.
Cheers